Dutch Synths

Some Service info

At this page you find some info concerning the Fénix. If you are not sure please contact me by mail. 
You'll need the following items to set up the Fenix for servicing:
- A clearly lit workbench with enough desk space to rest the Fenix case, the front panel and your tools. 
- A blanket or other soft nonconductive surface to rest the front panel face-down. 
- A Phillips screwdriver to open up the unit and a small flat-blade screwdriver to adjust the trim pots.
- Mains power and a simple sound system.
- A few patch cords and audio connection to your sound system.
- Some procedures require a voltage meter. Any digital multi meter will work fine.
- Some procedures require a Midi-interface & Midi-keyboard or a reference voltage source.
- If you need to desolder parts, please use Cut the part out and use desoldering braid. A part is rather cheap buta broken board isn't

Service parts

The Fénix uses normally available parts. At this moment some manufacturer has stopped with producing some of these parts. If you want to keep these parts in stock for servicing you can use the list below. This list isn't complete but it contains the less common parts. The Italic written parts appear 1 or 2 in the Fénix;
CMOS IC's:4006, 4070. (Note use for the 4006 the same brand for replacement)
OTA's :CA3280, LM13700, CA3080,
Opamps :CA3140, MC34084 (or TLE2074, TL054)
The common available parts used in the Fénix are TL074, TL072, BF245, BC550, BC547, BC557, 4001.If you cannot find these parts, I have some spare parts ( potmeters, knobs, power supply eo in stock) see Sparepart list

Fuses

The Fénix has an external and an internal power supply. Both having fuses The external has one fuse. The internal power supply (placed at the backpanel) has two fuses. If one of the fuses is blown you can replace this but use the same type.
The fuses (5*20mm) are: External powersupply: 250mA slow (at 230v setting). Internal powersupply: 2 * 1A fast.
If a fuse is blown, often there is something wrong! Never use a fuse >250mA.If the fuse is blown simultaneous when you plug in, then there is probably a shortage.  Check first what happens you power up the external power supply. If the fuse still blows, order a new psu, this one is broken. If not check the powerplug to the fenix.  If you manage to plugin wrong, the external psu will be shorted.Inside the fenix there are caps mounted to the powersupply connector and ground. ( these are for EMC purpase).  Sometimes these ceramic (10nF) caps are shorted the power supply. Cut them out, mayby the problem is solved.

Potmeters

Replacing the potmeters:The potmeters used in the fenix are standard potmeters, but some potmeters has a Potmeters from Taiwai Alpha (RV16 serie) and Omeg ( p16 serie) wil fit.  You need 6mm splindle.There potmeters with a A law (=Lin)  B law (=Log). Please note potmeters from Tanwai Apha use for log potmeters A and lin potmeter B.Also there are potmeters 10kC (=anti log) and 10kS ( S curve). If you cann't get these use a lin type potmeter. I have also a few of these special potmeters in stock . See spareparts list. See drawings for the used potmeters. ( A=lin B=Lof C=antilog S=Scurve) 

The VCO's are not tracking when i use a ... midi interface:

Most of the time this is a problem caused by the output design of the midi interface. The output of some of these interfaces has a high output impedance. If you connected fi the 3 VCO's and VCF's of the Fénix at this CV output, the load is too much for this output. The result is that the output voltage drops. The solution is, use a Fénix mixer connect the midi CV output to the CV1 input to drive the VCO's and VCF's.) 

Board layouts


vco1, 
vco2,  vcf1,  vcf2,  AD,  ADSR,  Mix,   PRM, LFO,  Int,  Div,

I hear an annoying hum:

Check for a groundloop. 

How can i check the power supply

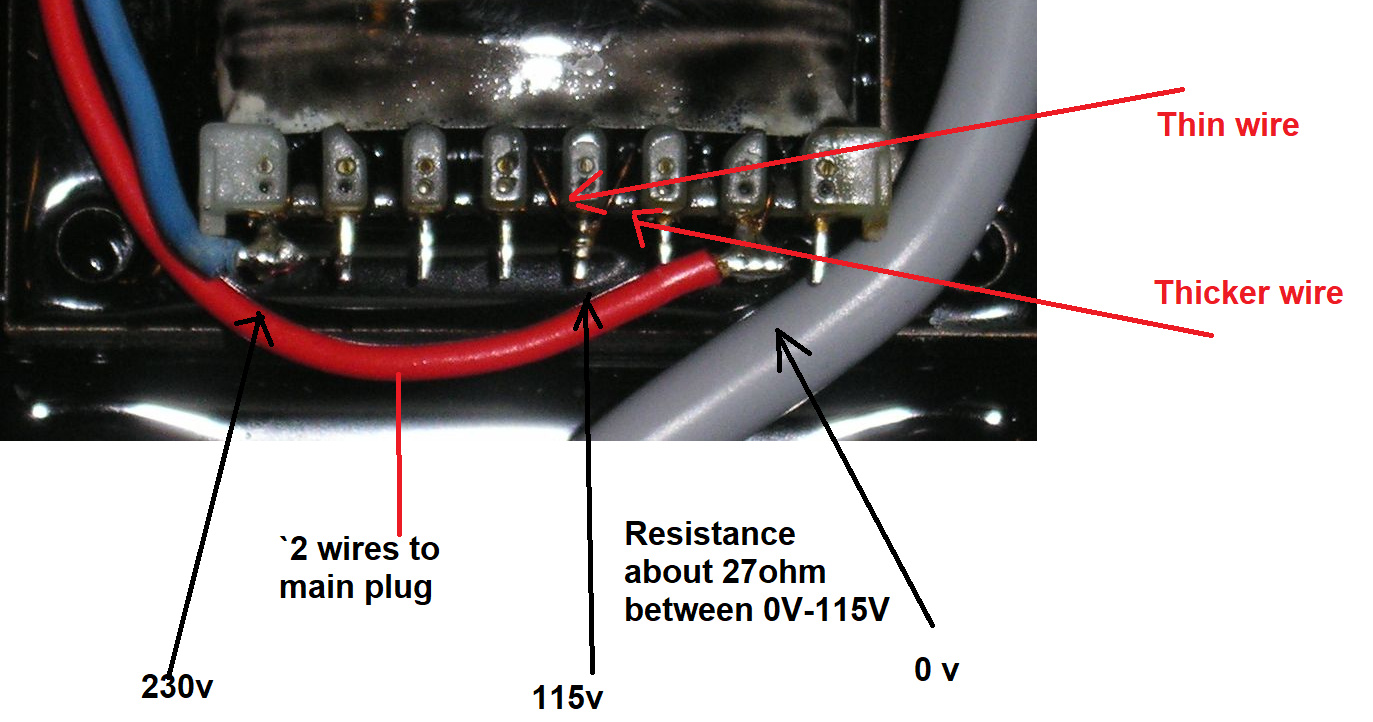
You must open the fenix and multimeter.  Connect the multimeter to the grondconnection at the back of the fenix.  Check the testpointsshow in the picture below. The Voltage at the fuses should be measured with the meter in AC Volt position. The -15 and +15 volt should  be measured with the meter in DC Volt position. 

115v/230 volt

The first Fenix power supply is only 230 volt.  The later power supply can be set at 115v and 230v.  If the label at the PSU show 115/230 volt than it can be set at 230 or 115 volt.


Below you see the connection for 230 volt.You can see a connection with 2 transformer wires. This the connection for 220/230v.


The picture shows a 230v connection. For 110/115 volt you should solder the blue wire to the 110/115v connection.
This is the connection 5 positions to the right.  You should measure a resistance (between the red wire and the110/115v connection) of about 27 ohms between these two connections.     
UNPLUG THE POWER PLUG BEFORE OPENING THE PSU